
20100426

20100425
Upcycled Diet Coke Business Card Holder


By ArchGrafix find it on Etsy : http://www.etsy.com/listing/45535139/upcycled-diet-coke-business-card-holder
20100424
Stencil Printing: A story of how to fix a mistake
I have decided that from time to time I will be posting tutorials on various diy crafts then expanding into home improvement tutorials later down the road (when I own rather than rent). Today marked the start of my journey of learning how to teach a craft to others online...it did not go as planned.
This tutorial is for creating a graphic tee using a stencil andbleach Simply Screen fabric paint.
Materials:
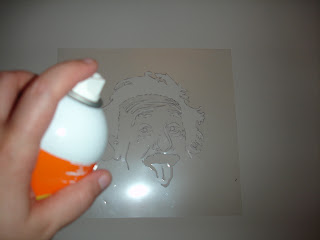
It started out well. I came up with what I hope is a really cool Einstein stencil design (shown below on bottom in hot pink*) based off a really fun public domain image of this great thinker (shown below on top). Oh, and before we go any further, this tutorial is a bit wordy but you can probably get the idea just from looking at the pictures.


I get done with my design and I really like where it is going (still do, I'm thinking an Einstein throw pillow might be in order). On to creating the stencil:

To create the stencil you need to find a clear plastic that is durable enough to withstand bending and pulling. It's a bit hard to see in the image but I found clear plastic blank stencil sheets at Hobby Lobby. I was unable to find an acceptable alternative at Wal-Mart or Michael's however your town could be stocked better than mine; I have found Dallas is not very craft friendly and had a better supply source in college in small town Stillwater, Oklahoma. If you can't find a good plastic order some online (search for Dura-Lar or similar item). I've actually successfully made a template using a waterresistant (important) poster board I found at Wal-Mart, but then the transfer process for the design to be cutout is different (perhaps that will be another tutorial).
Print out your pattern and tape it to your plastic then simply trace the outline with a fine permanent marker. Or you can freehand your design, I don't really care it's your project. You'll end up with something like this:

Now you are ready to cut out your design. If you are worried about cutting the wrong parts put an X in areas that are to be cut out; not need to fill them in completely unless you are trying to get a bad high off a sharpie (don't do that, it's not good for you). Use an X-acto knife to cut out your design....go slowly, be careful, take breaks if you are tired. I've been doing tedious cutting work since starting college and I still have to take my time; there simply is no rushing this part of the process and your eyes will get tired if you have a complex design.

Remove scarp plastic slowly, use your blade to carefully disconnect areas that you may have missed...did I mention you should be slow and careful? While I'm at it, don't cut towards yourself! I have a scar to remind me how important that grade school safety tip is.

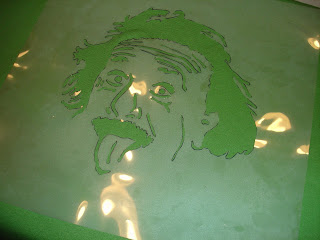
It might be hard to tell in the picture below but unless you are an X-acto master (in which case, why are you reading this?) you are going to end up with areas where you have cut a bit into the plastic that is to remain. This is okay as long as it is not major. You can try covering up major mistakes with masking tape; tape both sides.

Yay...we have our template:

Now it is time to put the design on something. if using a shirt, ship something in the center to protect the oppostie side, wax paper will work. Here you can see my trying out a suggestion to use freezer paper
 and iron it on the back side (you'll see later that it didn't help; however, freezer paper can be made into a template...perhaps that could be a later tutorial).

Now you need to apply spray adhesive to the wrong side of your stencil so it will adhere slightly to the fabric. I used Elmer's Craft Bond and followed 'permanent' instructions', but I doubt the brand matters. Immediately after applying spray glue, set the stencil on your fabric in the location you want the image to appear. Try to get it right the first time but you have a bit of wiggle room for moving the stencil around before the sticky won't stick anymore.
Now, cover up and mask off any fabric that is exposed. Even if you think you won't over-spray, you will.

Start spraying...go lightly.


Blot off the excess with a towel you don't care about.


Remove the template. Again...slowly, carefully; you don't want to rip it because it can be used for future projects. You end up with this:

Wait...what's wrong here? Why did my bleach run? I didn't think the green was actually changing colors (even though it was) and sprayed more on after blotting. Over saturated fabric allows the bleach (or virtually any dye /paint) to run under the template no matter how well it is adhered. You can't see it in this picture but I also accidentally dripped bleach on the arm.
The fix: First, tie-bleach (like tie-dye but with bleach instead of dye...I didn't have any dye on me nor anything to make dye) the shirt to cover up the accidental dripping.

Notice how it looks like the design is now exploding away from Einstein ? His work always makes me think of worm holes and then my head feels like it might explode...so an exploding pattern seemed fitting :)
Re-apply your stencil exactly where it was before. Apply screen printing paint around the edges and. using a piece of scrap cardboard, scrape over your design lightly till the paint is distributed evenly. It shouldn't matter what brand of paint you use, I used the cheap kind found in the fabric paint section of Hobby Lobby (it should say something about screen printing on it though because you want a flexible paint
 , otherwise it will crack like those shirts you made in kindergarten).

Carefully remove your template and wash it off so that the paint doesn't dry on it. I just used the bathroom sink...you'll need to use your fingers to encourage the paint to release. I'm glad I chose a non-toxic paint.

And the mistake has been fixed.

I'll post pictures of the completed shirt after the paint dries.
*Einstien design shown in this entry is copyright ArchGrafix/Whitney Ford. Please do not use without permission, I have to make a living too.
This tutorial is for creating a graphic tee using a stencil and
Materials:
- Sharpie
- Stencil Plastic
- X-Acto Blade
- Spray Adhesive
BleachScreen Printing Paint- Scrap Carboard
- T-Shirt
It started out well. I came up with what I hope is a really cool Einstein stencil design (shown below on bottom in hot pink*) based off a really fun public domain image of this great thinker (shown below on top). Oh, and before we go any further, this tutorial is a bit wordy but you can probably get the idea just from looking at the pictures.


I get done with my design and I really like where it is going (still do, I'm thinking an Einstein throw pillow might be in order). On to creating the stencil:

To create the stencil you need to find a clear plastic that is durable enough to withstand bending and pulling. It's a bit hard to see in the image but I found clear plastic blank stencil sheets at Hobby Lobby. I was unable to find an acceptable alternative at Wal-Mart or Michael's however your town could be stocked better than mine; I have found Dallas is not very craft friendly and had a better supply source in college in small town Stillwater, Oklahoma. If you can't find a good plastic order some online (search for Dura-Lar or similar item). I've actually successfully made a template using a waterresistant (important) poster board I found at Wal-Mart, but then the transfer process for the design to be cutout is different (perhaps that will be another tutorial).
Print out your pattern and tape it to your plastic then simply trace the outline with a fine permanent marker. Or you can freehand your design, I don't really care it's your project. You'll end up with something like this:

Now you are ready to cut out your design. If you are worried about cutting the wrong parts put an X in areas that are to be cut out; not need to fill them in completely unless you are trying to get a bad high off a sharpie (don't do that, it's not good for you). Use an X-acto knife to cut out your design....go slowly, be careful, take breaks if you are tired. I've been doing tedious cutting work since starting college and I still have to take my time; there simply is no rushing this part of the process and your eyes will get tired if you have a complex design.

Remove scarp plastic slowly, use your blade to carefully disconnect areas that you may have missed...did I mention you should be slow and careful? While I'm at it, don't cut towards yourself! I have a scar to remind me how important that grade school safety tip is.

It might be hard to tell in the picture below but unless you are an X-acto master (in which case, why are you reading this?) you are going to end up with areas where you have cut a bit into the plastic that is to remain. This is okay as long as it is not major. You can try covering up major mistakes with masking tape; tape both sides.

Yay...we have our template:

Now it is time to put the design on something. if using a shirt, ship something in the center to protect the oppostie side, wax paper

Now you need to apply spray adhesive to the wrong side of your stencil so it will adhere slightly to the fabric. I used Elmer's Craft Bond


Now, cover up and mask off any fabric that is exposed. Even if you think you won't over-spray, you will.

Start spraying...go lightly.


Blot off the excess with a towel you don't care about.


Remove the template. Again...slowly, carefully; you don't want to rip it because it can be used for future projects. You end up with this:

Wait...what's wrong here? Why did my bleach run? I didn't think the green was actually changing colors (even though it was) and sprayed more on after blotting. Over saturated fabric allows the bleach (or virtually any dye
The fix: First, tie-bleach (like tie-dye

Notice how it looks like the design is now exploding away from Einstein
Re-apply your stencil exactly where it was before. Apply screen printing paint

Carefully remove your template and wash it off so that the paint doesn't dry on it. I just used the bathroom sink...you'll need to use your fingers to encourage the paint to release. I'm glad I chose a non-toxic paint.

And the mistake has been fixed.

I'll post pictures of the completed shirt after the paint dries.
*Einstien design shown in this entry is copyright ArchGrafix/Whitney Ford. Please do not use without permission, I have to make a living too.
20100415


20100413
Natural Swimming Pool

From:
The Natural Swimming Pool (Lilypads Optional)
Currently, the only purveyor of natural pools in the US is Total Habitat of Kansas. They admit that natural swimming pools may cost slightly more to build than a standard swimming pool, but that have lower maintance and chemical costs. Also, conventional pools can be converted to natural pools; a post on naturalswimmingpools.info encourages the possibility of a DIY natural pool.

20100409


Subscribe to:
Posts (Atom)


